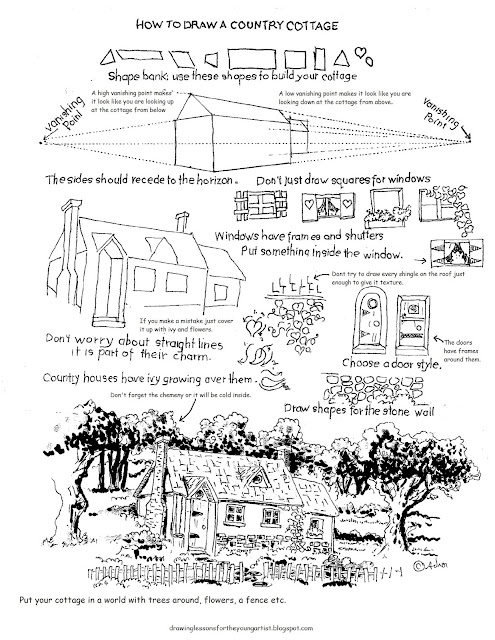
This is a free printable drawing worksheet, How to Draw a Country Cottage.
It is easy and fun to draw.
 |
| How To Draw A Cottage |
To print the drawing worksheet below, just highlight it and send it to your printer or save it to your device to print later. If you have problems printing, CLICK HERE to visit my how-to-print page for some suggestions or try one of the updated files below.
 |
| Printable How to draw a Country Cottage Updated worksheet |
Sometimes it takes me hours, but I create these how to draw worksheets, but I do it so that I can give back because I believe that when you have been given a gift, it is so you can be a gift to others, and I hope these worksheets are a means of blessing to you. You are welcome to print as many as you like.
Thank you!
CLICK HERE for a PDF formatted file.
Printable notes.
This is easy to draw using some basic shapes and a ruler for straight lines. The neat thing about a country cottage is they are often old and lean a little bit, so if the lines are not straight, it is OK; even a good thing because it will look like a real cottage that has been in the forest for a long time and about to fall over a little bit. (Somewhere, there is a cottage about to fall over; you might be drawing it and not even know it).
Remember the perspective, things get smaller as they go any distance, so use a vanishing point. That is the point far away from where the lines would appear to touch if they continued. I tried to illustrate this in the project paper below. If you pay attention to this rule, your cottage will look more realistic. If the vanishing point is too low, the cottage looks like you are looking down on it from a hill, or if it is too high, it looks like you are looking up at it from below. Put the vanishing point just a little below the center of the house, and it seems almost normal.
Draw the basic outline first, then look everything over and make any corrections. Now decide where windows and doors and things are going to be. Just outline them and when you have all the ideas in place, add the extra details like shutters or ivy, or hinges. These things are primarily rectangles and triangles.
Add extras like ivy crawling up the side of the house or a brick half wall at the bottom. Do not draw every brick in the chimney or every shingle on the roof, just enough to tell the story of bricks and shingles. For the roof shingles, draw the capital letter "L" all over the place, and it will look like shingles. For the stone around the bottom half of the wall, I draw each stone differently- it is easy to draw circles but boring, so keep changing the shapes and leave a little space between them. The ivy leaves are shaped like hearts and upside-down teardrops. Put a fence in front of your drawing by drawing lots of skinny rectangles.
The secret to this project is to take your time and enjoy the project. Add things like gardens, trees, a fence, a birdbath, or a swing.
Add trees behind and around the house and bushes.
Below I did an example with some watercolors; it took about 2 and one-half hours. Take your time, and you will be happy with the results. I sometimes take breaks or work on it for a little each day for a few days. It is worth it to have a finished painting you are proud of.
| Example for How to Draw a Country Cottage (c) Adron 2011 |
To see more about how to draw worksheets like this, click on the label for buildings in the sidebar.
(c) Adron D. 10/9/11
Please consider making a contribution to support this art blog. Please click HERE and enter an amount that shows your level of appreciation. Thank you.